How To Export Contacts In KW Command
To export your contacts from Command, follow these steps:
TAThe AMS TeamEditorial Team · March 14, 2025
Solo agents
To export your contacts from Command, follow these steps:
1. Access the Contacts Applet:
- Log in to https://agent.kw.com using your KW login credentials.
- Click the Contacts icon on the left sidebar.
2. Export All Owned Contacts:
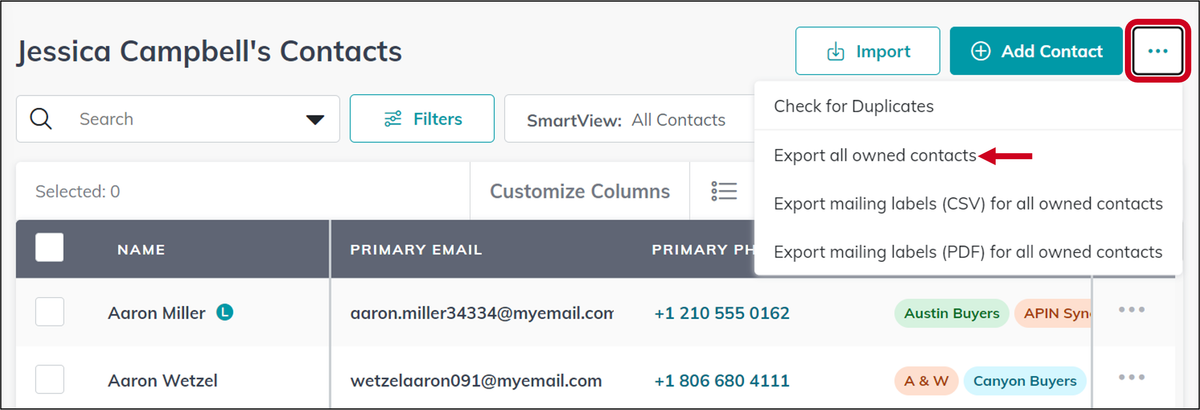
- Click the three dots next to the “Add Contact” button and select Export All Owned Contacts.
- A confirmation message will appear, indicating that the export is processing and will be sent to your KW Communications Email.
3. Retrieve the Exported File:
- The export process may be instant or take up to an hour, depending on the number of contacts.
- Check your KW Communications Email for an email with the subject “Contact Export” from no-reply@system.kw.com.
- Click the “Here” link in the email to download the export file. Note that this link is valid for 24 hours.
4. Export Selected Contacts:
- Use filters and search to narrow down your contact list.
- Check the box next to the contacts you wish to export (you can select up to 500 contacts at a time by adjusting the number of contacts displayed per page).
- Click the Bulk Actions drop-down and select Export.
- A confirmation message will appear, and the export file will be sent to your KW Communications Email as described above.
Team Command Accounts
Exporting contacts and mailing labels from your team Command account depends on your permission level and the ownership of the contacts. Here’s how to proceed:
Access the Team Command Account:
1. Log in to https://agent.kw.com with your Keller Williams credentials.
2. Click your name at the top right and ensure your team account is selected.
3. Click the Contacts icon on the left sidebar.
Export All Contacts or Mailing Labels:
1. Click the three dots next to the “Add Contact” button.
2. Depending on your permission level, select one of the following options:
- Standard and Enhanced Permissions:
- Export all owned contacts: Exports contacts you own in a CSV format.
- Export mailing labels (CSV) for all owned contacts: Exports mailing labels for your contacts in a CSV with address fields separated.
- Export mailing labels (PDF) for all owned contacts: Exports mailing labels in a PDF format suitable for printing on Avery 5160 labels (1” x 2-5/8”, 30 per sheet).
- Unlimited Permissions:
- Export all team contacts: Exports all contacts in the team account, regardless of ownership, in a CSV format.
- Export mailing labels (CSV) for all team contacts: Exports mailing labels for all team contacts in a CSV with address fields separated.
- Export mailing labels (PDF) for all team contacts: Exports mailing labels for all team contacts in a PDF format suitable for printing on Avery 5160 labels.
3. A confirmation message will appear indicating that the export is processing and will be sent to your KW Communications Email.
Retrieve the Exported File:
- The export process may be instant or take up to an hour, depending on the number of contacts.
- Once the export is finished, you’ll receive a notification. Refresh the page in Command, click the Command Notifications icon, and then click the link to download the export file.
Export Selected Team Contacts:
Only Rainmakers and team members with Unlimited permissions can export selected team contacts:
1. Use filters and search to narrow down your contact list.
2. Check the box next to the contacts you wish to export (you can select up to 500 contacts at a time by adjusting the number of contacts displayed per page).
3. Click the Bulk Actions drop-down and select one of the export options:
- Export: Exports the selected contacts in a CSV format.
- Export Mailing Labels: Exports mailing labels for the selected contacts in a CSV with address fields separated.
- Export Mailing Labels as PDF: Exports mailing labels in a PDF format suitable for printing on Avery 5160 labels.
4. A confirmation message will appear, and once the export is finished, you’ll receive a notification. Refresh the page in Command, click the Command Notifications icon, and then click the link to download the export file.
Frequently asked questions
How do I export all my contacts from KW Command?+
Log in to agent.kw.com, click the Contacts icon on the left sidebar, click the three dots next to the Add Contact button, and select Export All Owned Contacts. A confirmation appears and the file is sent to your KW Communications Email.
Where does the exported file get delivered?+
To your KW Communications Email. Look for an email with the subject Contact Export from no-reply@system.kw.com, then click the Here link to download it. That link is valid for 24 hours.
How long does a contact export take?+
It may be instant or take up to an hour, depending on how many contacts you have.
How many contacts can I export at once?+
Up to 500 at a time. Use filters and search to narrow your list, adjust the number of contacts displayed per page, check the boxes next to the ones you want, then click Bulk Actions and select Export.
Can I export mailing labels instead of a contact list?+
Yes. You can export mailing labels as a CSV with address fields separated, or as a PDF formatted for printing on Avery 5160 labels, which are 1 inch by 2-5/8 inch, 30 per sheet.
Can I export contacts I do not own from a team account?+
Only with Unlimited permissions. Standard and Enhanced permissions can export owned contacts and their mailing labels. Exporting all team contacts, or selected team contacts, requires Rainmaker or Unlimited permissions.